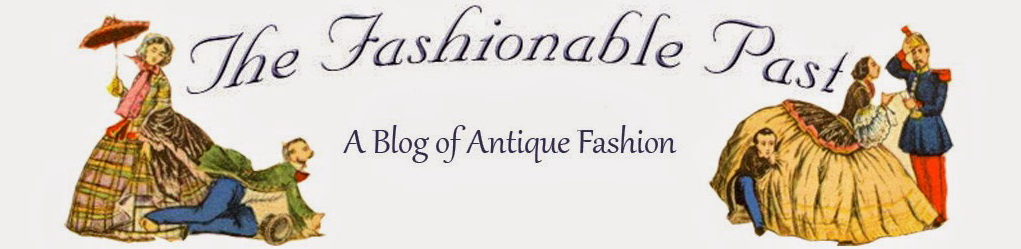

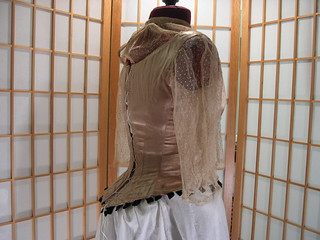
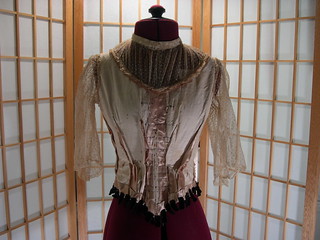
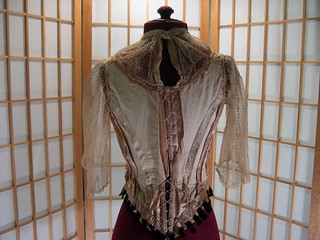
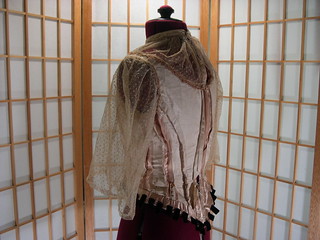
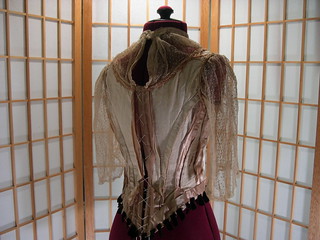
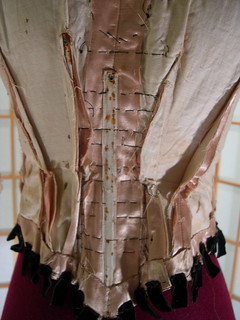
One bodice in my collection is an evening bodice from the 1880s. It has a V neck, points at both the front and back waists, and the back is cut to accommodate a bustle. The bodice has four pieces—front, side front, side back, and back—on each side, for a total of eight pieces. This allows for a very smooth fit.
For more and full size pictures of this bodice, here's the Flickr set on the new (sigh) Flickr!
This article originally appeared on Your Wardrobe Unlockd and I presented it at Costume College.
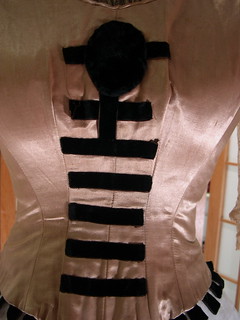
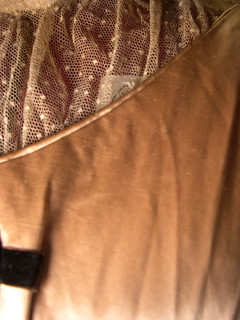
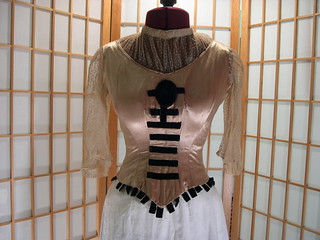
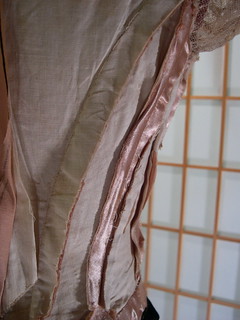
The bodice is made of lightweight pink satin flat lined with a lightweight cotton. It’s trimmed with velvet ribbon, which has a black pile with a brown backing and cotton point d’esprit, which, while it's ecru now, was most likely originally white. The back laces close through very tiny handsewn eyelets.

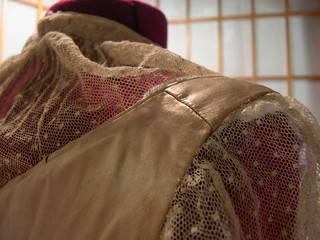
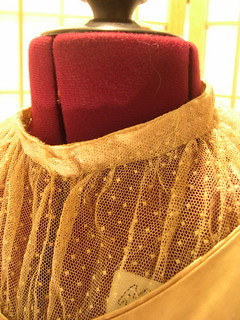
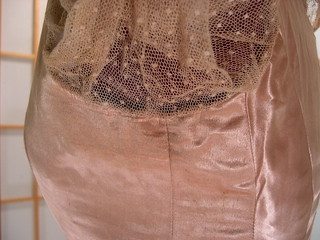
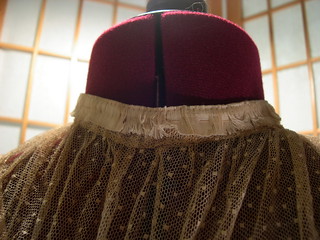
The point d’esprit resembles an underbodice. It appears to have been part of the original design, not a later addition as it is used to finish the armscyes. The sheer, lightweight fabric preserves the look of the evening bodice while providing the wearer with a little more coverage.
Measurements
The bodice is quite small. It measures 23" (58.4cm) at the waist and 31" (78.7cm) at the bust. The center front measures 11½" (29.2cm), the underarm measures 8½" (21.6cm), and the center back measures 14" (35.6cm).
It’s possible that this dress was for a young woman whose mother felt her daughter wasn’t fully ready for the low necklines required for evening, or at the other end of the spectrum, an older woman who wanted to hide her no-longer-youthful neckline and arms while keeping fashionable lines. Though the small size does suggest a younger woman, it is impossible to know for sure who owned the bodice and why she decided on using the netting. Perhaps she simply liked it. Whatever the reason, the effect of the netting is quite charming, and would be an attractive and somewhat unusual addition to a reproduction.
Construction
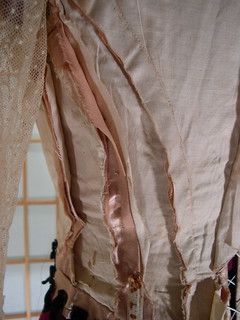
While the outside of the bodice is beautifully done, the inside shows sloppy, unfinished work that most modern seamstresses would be ashamed of. The seam allowances are left raw, the boning is merely basted in, and the large stitches used to sew on the velvet trim are clearly visible. The bodice is a good reminder that while we make our recreations for an event with a deadline and have the luxury of budgeting our time (or, at least we hope!), they were making clothing to wear. The fabrics used for this bodice are both strong and don’t ravel, therefore, there was no need to spend valuable time finishing the inside of the bodice. That decision hasn’t harmed the bodice at all—not only did it survive normal use during its expected lifetime, it’s still around today.
I’ve found that this lack of detail on the inside creates a better behaving bodice. With flat lining, the layers of the bodice work together instead of fighting each other the way they can do with bag lining. Though the end result may not look professional—or even finished—to modern eyes, its flexibility suits the ideal curvy Victorian figure very well.

The bodice is constructed with a combination of hand sewing and lock stitch machine sewing. The main seams are sewn by machine, as is the first step in the bias binding around the waist, while the finishing is done by hand.
Each piece of satin is flat lined with a piece of cotton cut to the same shape. The two pieces are then treated as one. There is no evidence that the layers were basted together prior to sewing, and there is no interlining between the two layers.
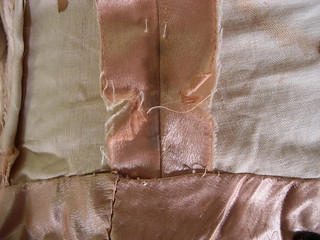
Seam Allowances
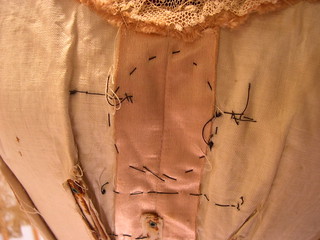
The seam allowances vary. The center backs were cut on the selvage. The left back allowance measures 1¾" (4.4cm) from the fold, while the right back measures 1+7/8" (4.8cm). The curved back seam allowances vary between ½" and 5/8" (1.3-1.6cm). The side back seam allowances both measure ½" (1.3cm). The side seam allowances measure ¾" (1.9cm). The center front seam allowance differs on each side. At the top, it measures ¾" (1.9cm) both left and right, but at the bottom, the right side grows to an inch (2.5cm). This difference is can be seen on the center front panels of the outside of the bodice, which are slightly lopsided.
The seam allowances are all clipped at the waistline, with large, triangle shaped pieces taken out. This would allow the bodice to curve smoothly over the waist.
Darts
The darts, which start out being about an inch (2.5cm) wide at the bottom and narrow to almost nothing at the top, end at the fullest part of the bust.
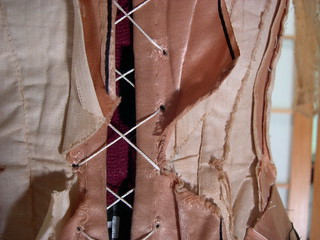
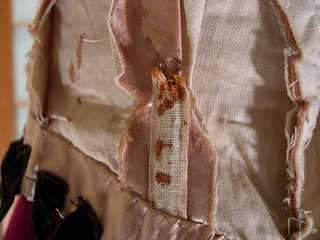
Eyelets: heavier thread, 1/8 inch, 30 in all.
There are fifteen tiny eyelets on each side, measuring about 1/8" (3mm) in diameter. They are sewn with a heavier thread than the rest of the bodice. Not all of the eyelets are perfectly round, but with a lacing cord, they’re small enough that any irregularities wouldn’t be noticeable.
Boning
Though the bodice was meant to be worn over a corset, it is still boned. In order to support the lacing, keep the waistline points flat and create a smooth line over the hips, the bodice itself needed support.
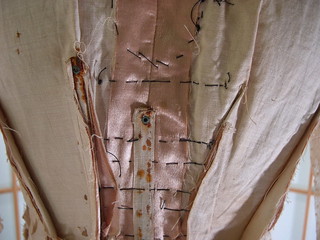
All seams appear to have been initially boned, though most of it has been removed, presumably to be used in another bodice. Only the boning on the center back, center front, one dart, and one broken bone on the side seam remain. The boning was lightly basted in using large stitches. Traces of these stitches remain on all seams, as it wouldn’t have mattered if they remained once the boning was removed.
The boning is uncoated spring steel and has rusted over the years. It is encased in plain weave cotton casings, each with a metal eyelet at the top. This eyelet goes through both the boning and the casing, therefore preventing the bone from slipping in the casing.
While most of the boning was just sewn to the seam allowances, the stitches that held the boning in place go through all the layers on the left underarm. I can only imagine that this was a mistake, as no other hand stitching is visible on the outside of the bodice. Perhaps by the time this was noticed, it was too late to fix. It is barely visible and doesn’t affect the overall look of the bodice.
The boning at the center back seams is held in place by the eyelets. In order to help with the placement of the eyelets, the seamstress marked each side of the bone with basting stitches. The bodice is folded on one line of basting stitches, and the eyelets are sewn next to the other line.
Finishing
The neckline is finished with what appears to be pink silk piping at first glance; however, no piping cord is present. It is possible that there was a cord that has disappeared over the years.
The bias peeking over the neckline is quite wide, nearly ¼" (6mm), and open at the back edges. It may have once held a cord that would help pull in the low neckline.
The piping channel is sewn to the bodice by hand. The bottom edge of the piping channel is not folded under, and the raw edge is sewn by hand with large zig zag stitches.
Armscyes: turned under once, basted to lining, raw edges, no stitches visible on outside
The armscyes are simply turned under 3/8" (1cm) and basted to the lining. The edges are left raw. No stitches are visible on the outside of the bodice
Netting
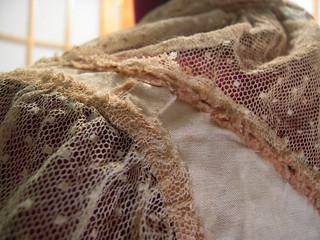
The point d’esprit netting helps to finish both the neckline and the armscyes. Both the sleeves and neck insert are gathered by hand, and then basted in. The edge of the netting goes just past the raw edges, adding a layer of protection.
The neckline is gathered into a band of point d’esprit, and backed with a piece of cotton tape for security. The tape is lightly basted to the netting with large stitches varying between ¼" and ¾" (6mm and 19mm).
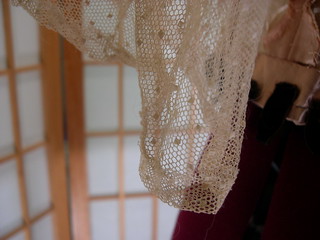
The sleeves are finished with a one turn hem that measures 3/8" (1cm).
Bottom Edge: self bias, machine sewn, finished by hand, unpicked to remove boning
The bottom edge of the bodice is finished with a self bias of the pink satin. It is sewn by machine, turned up, and sewn down by hand. The top edge is turned under. This was done after the boning was in place, as the boning ends at the bottom edge of the bodice. The bias was unpicked at each seam in order to remove the boning.
Trim
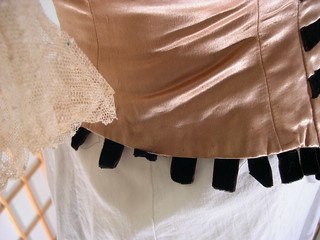
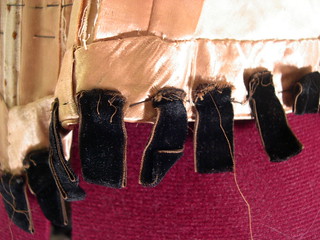
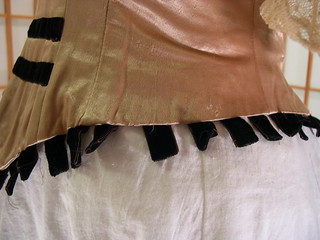
The velvet ribbon was sewn last and positioned to take advantage of the finished shape of the bodice, in particular emphasizing the curves between the hips, waist and bust.

The trim at the center front of the bodice consists of seven horizontal bands of velvet ribbon, and one vertical band that terminates in an oval of velvet. The bottom five bands stretch between the darts, emphasizing the curve of the waist. The top two bands are slightly narrower. The oval is made of a larger piece of velvet, and the ends are turned over before it's sewn into place. All these bands are sewn into place with large basting stitches. This keeps the bodice from puckering from too much tension and lets the trim lie smoothly. The bottom of the bodice is trimmed with 38 loops of the same velvet ribbon that trims the front. Each loop is folded up and basted into place. The placement of these loops adds interest to the bottom of the bodice, and draws attention away from the waist, helping to make it look smaller.
Overall, I feel that this bodice is a good overview of Victorian construction techniques. The flat lining, attention to detail only where it shows, and types of stitches used are all things that I’ve seen on other bodices in my collection. If you’re used to modern sewing techniques, then Victorian sewing techniques might seem a little strange at first, but once you’re used to them, they truly make sense and help to make your clothing to look authentic.
This is amazing!! Thank you so much for sharing all these fabulous pictures and information.
ReplyDeleteThe net underbodice is very interesting. At first I thought it was only to cover your dressform. I wonder if this was for an older or married woman.
ReplyDelete